
September 16, 2026
Connectbase Communications
Introduction
Every exhibitor walks into a trade show with the same goal: stop visitors in their tracks and turn a five-second glance into a genuine conversation. But what most first-time exhibitors don’t realise is that this outcome is decided weeks before the show even opens — at the design table, not on the show floor.
This is where exhibition stall 3D design becomes the single most important step in the entire process. A well-planned 3D design lets you see, adjust, and perfect your product displays, walkways, and branding elements long before a single panel is cut or a single rupee is spent on fabrication.
In this guide, we’ll walk you through exactly how to plan your product displays using 3D design — what to look for, what mistakes to avoid, and how a professional design-first approach saves you money, time, and stress before your next exhibition.
Why Product Display Planning Cannot Happen After Fabrication Begins
Many exhibitors treat product display placement as an afterthought — something to figure out once the stall structure arrives at the venue. This is one of the costliest mistakes in exhibition planning.
Once fabrication is complete, your stall’s layout is fixed. If a display counter blocks the entry sightline, if there isn’t enough room for a demo area, or if lighting doesn’t hit your flagship product correctly, there is no easy fix on-site. You either live with the flaw for the entire show or pay for expensive last-minute alterations.
Planning your product displays inside a 3D model first means every one of these issues is caught and corrected on a screen, not on the show floor. This is precisely why our Exhibition Stall Design Services always begin with a detailed 3D visualisation stage before any fabrication drawing is finalised.
What Exhibition Stall 3D Design Actually Involves
A proper 3D design process is far more than a “pretty rendering” to approve. It’s a working blueprint that answers real operational questions:
- Where will each product be displayed, and at what height and angle for maximum visibility?
- How will visitors move through the space — and where will they naturally pause?
- Where do lighting fixtures need to sit to highlight hero products without creating glare?
- Is there enough breathing room around display units for visitors to interact comfortably?
- Do branding elements (logos, backlit panels, hanging structures) compete with or support the product display?
- How does the stall look from every entry point on the show floor, not just the “hero” front angle?
A skilled design team models all of this in 3D — often with multiple camera angles and walkthrough views — so you’re approving a realistic simulation of the final stall, not guessing from a flat floor plan.
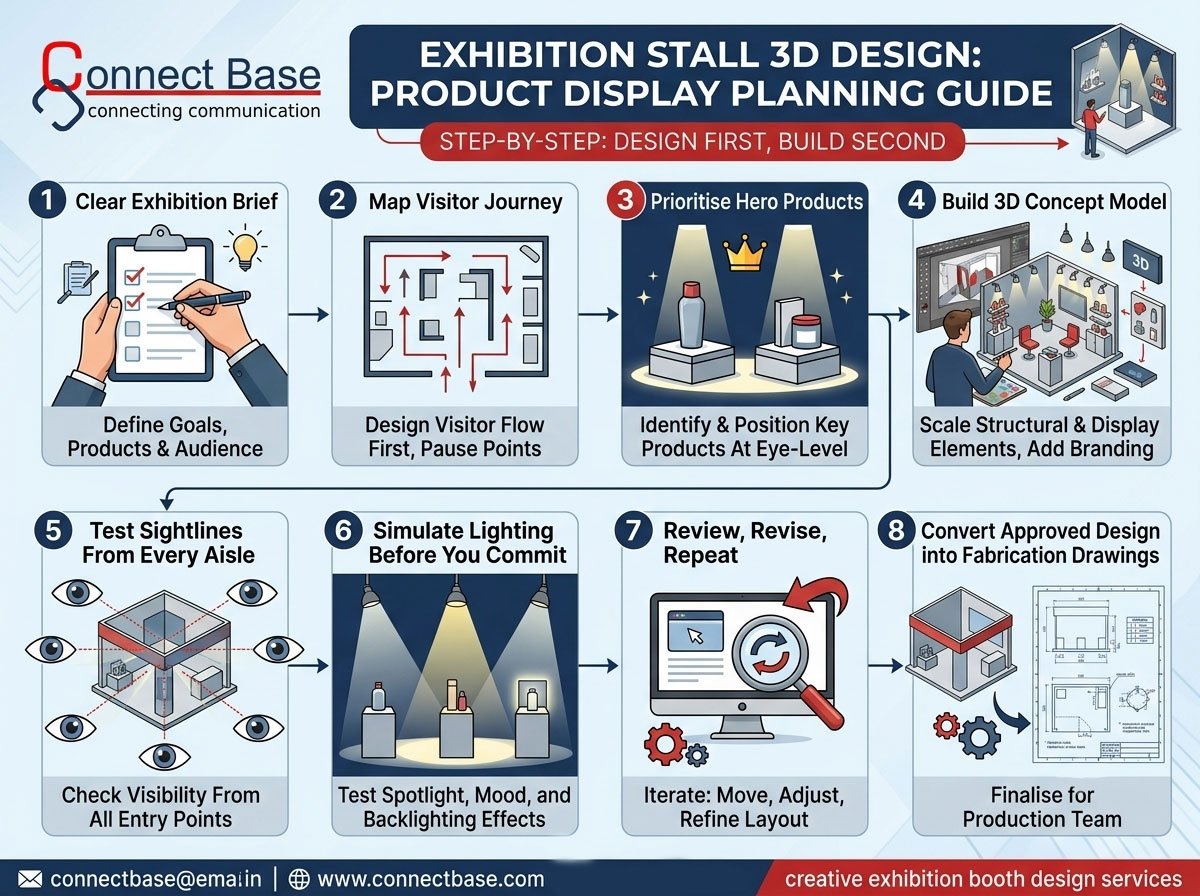
Step-by-Step: How to Plan Product Displays Before Fabrication
1. Start With a Clear Exhibition Brief
Before any 3D model is built, define the essentials: your stall size, hall location, number of products to display, target audience, and the key message you want visitors to walk away with. This brief becomes the foundation the entire design is built on.
2. Map the Visitor Journey First, Displays Second
Rather than deciding where products go and then figuring out walkways around them, flip the process. Map how visitors will enter, move, and exit the stall. Identify natural pause points — corners, counters, demo zones — and only then place your key product displays at those high-traffic pause points.
3. Prioritise Your Hero Products
Not every product deserves equal visual weight. Identify two or three “hero” products or services that should command the most prominent positions — typically at eye level, near the entrance, or under focused lighting. Secondary products can be arranged around them in supporting display units.
4. Build the 3D Concept Model
This is where your brief and layout decisions come to life. A 3D concept model should include:
- Structural elements (walls, counters, backdrops, overhead structures)
- Product display units placed to scale
- Branding graphics and signage positions
- Lighting placement and effect simulation
- Furniture, seating, and meeting areas if applicable
At this stage, request multiple angles — front view, aerial/top-down view, and at least one walkthrough perspective — so you can evaluate the stall the way a real visitor will experience it.
5. Test Sightlines From Every Aisle
A common oversight is designing only for the front-facing aisle. In most exhibition halls, stalls are visible from two, three, or even four sides. Review your 3D model from every open side of your stall to make sure your key products and branding are visible no matter which direction a visitor approaches from.
6. Simulate Lighting Before You Commit
Lighting dramatically changes how a product display feels — and how it photographs for social media and press coverage. A 3D render with accurate lighting simulation lets you test spotlighting on hero products, ambient lighting for the overall mood, and backlit branding — all before physical fixtures are ordered. We cover this in more depth in our related post on how to use lighting to make your exhibition stall more attractive.
7. Review, Revise, Repeat
The biggest advantage of 3D design is that revisions are virtually free compared to physical changes. Use this stage to iterate — move a display counter, adjust a walkway width, swap a branding panel — until the layout feels right. A good design partner will offer at least two to three rounds of revisions before locking the final design.
8. Convert the Approved 3D Design Into Fabrication Drawings
Once the 3D design is finalised and approved, it’s translated into precise technical drawings and material specifications for the fabrication team. This is the handover point where design intent becomes buildable reality — and it’s why the fabrication and design stages must work off the exact same approved 3D model, with no guesswork in between. Our Exhibition Stall Fabrication Services team works directly from these approved 3D designs to ensure zero deviation between what you approved and what gets built.
Common Mistakes to Avoid When Planning Product Displays
Overcrowding the display area. More products on show doesn’t mean more sales. Cluttered displays overwhelm visitors and dilute focus from your key offerings. A 3D model makes overcrowding obvious long before it becomes a physical problem.
Ignoring walkway width. Displays that look fine on a 2D floor plan can create bottlenecks in 3D once real visitor traffic is simulated. Always check that primary walkways allow at least two people to pass comfortably.
Designing only for the “hero shot” angle. As mentioned above, most stalls are viewed from multiple sides. Design for all of them.
Skipping the walkthrough view. A top-down floor plan alone hides a lot of real-world problems — awkward eye-level views, hidden displays behind counters, or lighting glare. Always insist on an eye-level walkthrough render.
Finalising fabrication before design sign-off. This is the single most expensive mistake exhibitors make. Never allow fabrication to begin on an unapproved or partially approved 3D design.
The Business Case for 3D Design-First Planning
Beyond aesthetics, planning product displays through 3D design delivers measurable business benefits:
- Fewer costly changes: Catching design flaws on-screen costs nothing; catching them on-site after fabrication costs time, materials, and labour.
- Faster stakeholder approvals: A realistic 3D render is far easier for internal teams and management to approve than a flat 2D drawing or a written description.
- Better ROI per square metre: Every product placement decision is deliberate, tested, and optimised for visibor engagement rather than guessed at.
- Consistent brand experience: When lighting, signage, and product placement are planned together in one 3D model, your stall feels cohesive rather than assembled piecemeal.
- Shorter on-site build time: Fabrication teams working from a fully approved 3D design and technical drawing set spend less time troubleshooting on-site, reducing setup stress before the show opens.
If you’d like to see how a fully planned 3D concept actually becomes a finished, built booth, our related article, from 3D concept to reality: how exhibition stall design becomes a finished booth, walks through the entire journey stage by stage.
How Connectbase Communications Approaches 3D Design and Product Display Planning
At Connectbase Communications, we treat 3D design as the most critical stage of the exhibition process — not a formality before fabrication. With 15+ years of experience designing and fabricating exhibition stalls across Ahmedabad, Mumbai, and Delhi, our approach includes:
- A dedicated briefing session to understand your products, audience, and exhibition goals
- Multi-angle 3D concept design through our D Exhibition Stall Design service
- Visitor flow and sightline testing built into every design
- Lighting simulation to highlight your hero products correctly
- Seamless handover from approved 3D design to our in-house Exhibition Stall Fabrication team — keeping design and execution under one roof
- Custom, creative booth concepts through our Creative Exhibition Booth Design Services in Ahmedabad for brands that want a distinctive, non-templated presence on the show floor
Because design and fabrication happen under the same roof, there’s no disconnect between what you approve on-screen and what gets built on the show floor — the exact gap that causes most last-minute exhibition problems.
To see how design elements directly influence conversion at your stall, also read our post on what makes a high-converting exhibition stall.
Conclusion
Your exhibition stall’s product displays shouldn’t be decided on the show floor — they should be tested, refined, and approved inside a detailed 3D design, well before fabrication ever begins. This single shift in process — design-first, build-second — is what separates stalls that quietly blend into the exhibition hall from stalls that stop visitors mid-stride and pull them in.
If you’re preparing for an upcoming trade show and want your product displays planned properly from day one, explore our full range of Exhibition Stall Design services, or browse more expert insights on our exhibition design blog.
Ready to plan your next exhibition stall the right way? Get in touch with Connectbase Communications: 📧 Email: bhavesh.connectbase@gmail.com 🌐 Website: www.connectbasecommunications.com 📞 Call: +91 7600 576410 Or contact us directly here for a free consultation.
