
September 15, 2026
connectc1
Introduction: Light Is the First Thing a Visitor Notices
Walk into any exhibition hall and close your eyes for a second. Now open them. What pulls your attention first? Not the graphics. Not the logo. Not even the product. It is the glow.
In a hall with two hundred competing stands, the human eye moves toward brightness before it moves toward meaning. This is not marketing theory, it is biology. Visitors scan a hall at walking speed, giving each stall roughly two to three seconds of attention. Lighting is what buys you those seconds, and once you have them, everything else, your messaging, your product demo, your sales team, finally gets a chance to work.
At Connectbase Communications, we have built exhibition stalls across trade shows in Ahmedabad, Gandhinagar, Mumbai, Delhi and beyond, and the pattern repeats at every single show: two stands with identical footprints and similar budgets can pull dramatically different footfall, and lighting is usually the difference. This guide breaks down exactly how to use lighting to make your exhibition stall more attractive, from the technical fundamentals to the practical mistakes that quietly kill a stand’s presence.
Why Lighting Matters More Than You Think
Good exhibition stall lighting does four jobs at once:
1. It creates visibility from a distance. Most exhibition halls use flat, high-bay overhead lighting that washes everything in the same dull tone. A well-lit stand cuts through that flatness and becomes visible from three or four aisles away.
2. It controls where the eye travels. Lighting is a silent director. Brighten your hero product and visitors will look at your hero product. Leave everything equally lit and visitors will look at nothing in particular.
3. It sets emotional tone. Warm light feels welcoming and premium. Cool light feels clinical, technical and precise. Coloured light feels energetic and youthful. Your lighting temperature communicates your brand personality before a single word is spoken.
4. It increases dwell time. Comfortable, glare-free lighting keeps people standing at your stall longer. Longer dwell time means more conversations, and more conversations mean more qualified leads.
If you are still in the planning phase, our exhibition stall design services page explains how lighting is integrated from the first 3D concept rather than added as an afterthought.
Lighting Fundamentals Every Exhibitor Should Understand
You do not need to be an electrical engineer, but knowing four terms will make every conversation with your fabricator far more productive.
Lumens (Brightness)
Lumens measure actual light output. Watts measure power consumption. With LED, a 20W fixture can outperform a 100W halogen. Always ask your vendor for lumen output, not wattage, when comparing fixtures.
Colour Temperature (Kelvin)
This is the warmth or coolness of white light.
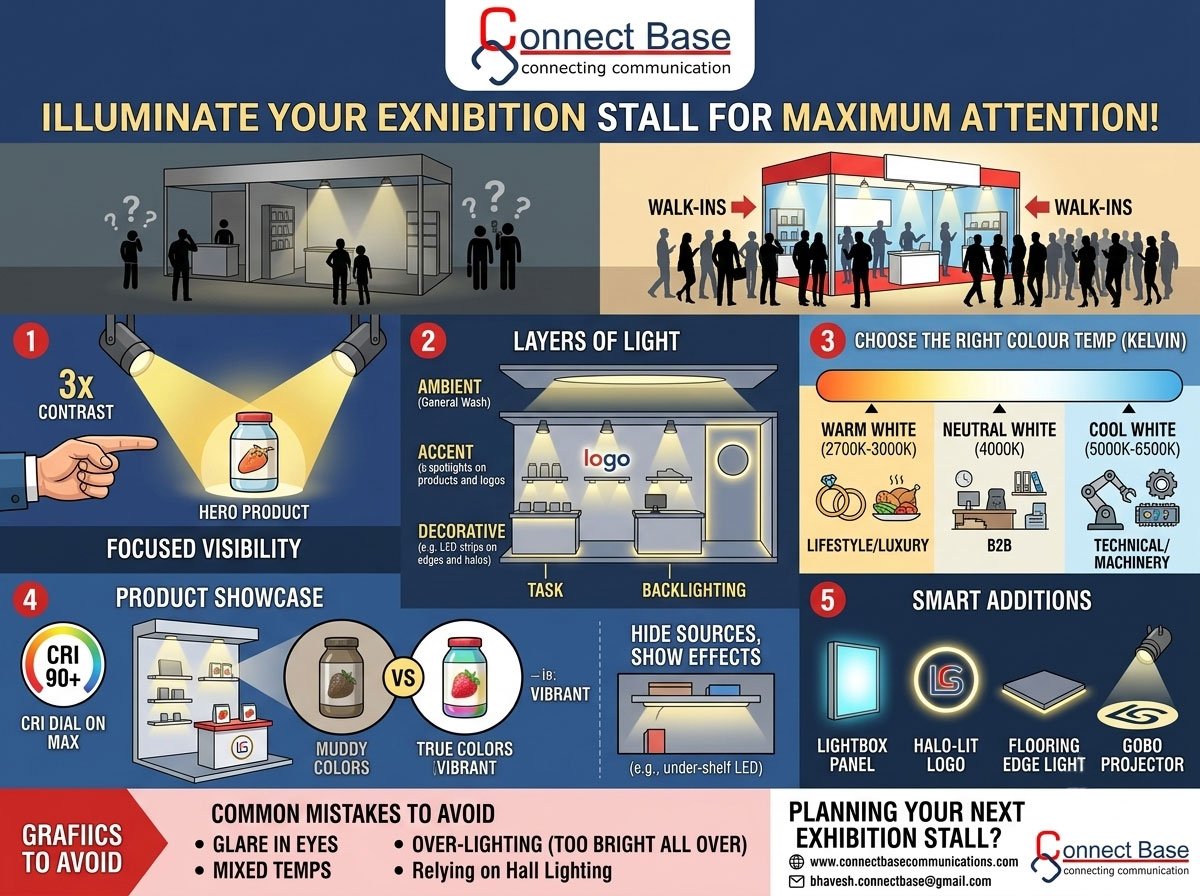
- 2700K to 3000K (Warm White): Cosy, premium, inviting. Ideal for hospitality, jewellery, furniture, textiles, food and lifestyle brands.
- 4000K (Neutral White): Balanced and natural. Safe default for most B2B stands.
- 5000K to 6500K (Cool White): Crisp and clinical. Suits pharma, machinery, electronics, automotive components and medical equipment.
The single most common mistake we correct on site is mixing temperatures accidentally, a 3000K spotlight next to a 6000K strip makes a stall look unfinished and cheap.
CRI (Colour Rendering Index)
CRI measures how accurately a light source shows true colours, on a scale up to 100. Anything below CRI 80 will make your products look washed out and your printed graphics look muddy. For any stand where product colour matters, fabrics, paint, packaging, cosmetics, food, insist on CRI 90 or above. This is a small cost difference with an enormous visual payoff.
Beam Angle
Narrow beams (15 to 24 degrees) create dramatic, focused pools of light, perfect for spotlighting a single product. Wide beams (40 to 60 degrees) wash surfaces evenly, perfect for lighting graphic panels. Most stands need both.
The Four Layers of Exhibition Stall Lighting
Professional lighting design is layered. Think of it as building an image with four separate tools.
Layer 1: Ambient Lighting
This is your base level, the general illumination that keeps the stall from looking like a cave. Overhead truss-mounted LED panels, recessed ceiling lights in a closed-ceiling stall, or simple wash fixtures do this job. Ambient light should be comfortable but deliberately not the brightest thing in your stand. If ambient light is too strong, your accent lighting has nothing to contrast against.
Layer 2: Accent Lighting
This is where attraction actually happens. Accent lighting picks out specific objects, a product, a logo, a sample display, and makes them significantly brighter than their surroundings. A useful rule of thumb: your accent lights should be roughly three times brighter than ambient light for the object to read as “featured.”
Track-mounted adjustable spotlights are the workhorse here because they can be re-aimed on site once the stall is built and you discover where the product actually ended up.
Layer 3: Task Lighting
Anywhere your team works, a reception counter, a demo table, a meeting pod, a storage area, needs functional light. Task lighting is often forgotten until the first day of the show when a salesperson cannot read a form. Under-counter LED strips and small directional fixtures solve this cheaply.
Layer 4: Decorative and Architectural Lighting
This is lighting as design element rather than illumination: backlit fabric walls, illuminated logos, edge-lit acrylic, glowing counters, LED-lined arches and ceiling features. This layer is what people photograph and post on LinkedIn, which is free reach for your brand long after the show closes.
12 Practical Lighting Ideas That Work on the Show Floor
1. Backlit Fabric Walls (SEG Lightboxes)
Still the highest-impact investment in modern stall design. A silicone-edge graphic stretched over an LED-lit frame produces an even, glowing panel with no visible hotspots. It is lightweight, reusable, and readable from a long distance. If you are choosing between one expensive feature and several cheap ones, choose this.
2. Halo-Lit (Backlit) Logos
Mounting your logo a few centimetres off the wall with LEDs behind it creates a soft glow outline. It reads as premium, costs far less than most people assume, and photographs beautifully.
3. Focused Product Spotlighting
Aim narrow-beam spots at your hero products and deliberately dim the surrounding area. Museums have used this technique for a century because it works. Contrast, not brightness, creates focus.
4. Illuminated Reception Counters
A glowing counter draws people to the exact point where you want conversations to start. Use frosted acrylic panels with LED strips inside to avoid visible dots.
5. Under-Shelf and Cove Strip Lighting
Hidden LED strips under shelves, inside display niches and along cove ceilings add depth and a finished, architectural quality. The rule is simple: hide the source, show the effect.
6. Gobo Projection
A gobo projector throws your logo or a pattern onto the floor or a wall. It is one of the cheapest ways to claim visual territory beyond your stall’s physical boundary.
7. Vertical and Overhead Signage Lighting
If your stall has a hanging banner or overhead structure, lighting it means visitors can find you from across the hall. This is especially valuable in large halls where aisle-level sightlines are blocked.
8. Colour-Changing RGB Accents
Used with restraint, RGB lighting adds energy and lets you match brand colours exactly. Used without restraint, it makes a professional stand look like a nightclub. Keep RGB to accent zones, never to your main product lighting.
9. Light Walls and Media Integration
Combining LED video walls with ambient lighting lets you shift the whole mood of the stall between demos and quiet conversation periods. Our LED and audio-visual solutions integrate screens and lighting on a single control system.
10. Floor Lighting and Illuminated Flooring
Lit floor edges and glowing platform bases lift your stall visually off the hall floor, creating the impression of a designed space rather than a booth.
11. Layered Ceiling Features
Suspended lit rings, slats or fabric clouds create a sense of enclosure and identity even in an open stall layout. This works particularly well in large custom exhibition stand builds.
12. Dimmers and Scene Control
A dimmable setup lets you run bright and energetic during peak hours, and softer during client meetings. Small change, big perceived polish.
Matching Lighting to Your Stall Size
Small stalls (9 to 18 sqm): Go vertical. Backlit walls and a lit logo deliver more impact per rupee than a dozen small spotlights. Avoid heavy overhead rigs that make the space feel compressed. See our small stall and shell scheme designs for reference builds.
Medium stalls (18 to 50 sqm): This is where full layering pays off. Combine backlit graphics, spotlit product zones, and one illuminated architectural feature.
Large stalls (50 sqm and above): Use lighting to zone the space, brighter in demo and reception areas, softer in meeting zones. Consider DMX control so the entire stall can change mood together. Our double decker and large format stalls rely heavily on zoned lighting to guide visitor flow.
Common Exhibition Lighting Mistakes to Avoid
Relying on hall lighting. Venue overhead lighting is designed for safety and general visibility, not for making your brand look good. Treat it as background noise you need to overcome.
Glare into visitors’ eyes. Poorly aimed fixtures that shine outward instead of onto surfaces physically push people away. Always aim inward and downward.
Mixed colour temperatures. Decide on one primary temperature and stick to it throughout.
Over-lighting everything equally. If everything is bright, nothing is featured. Contrast is the tool, not brightness.
Ignoring heat. Older fixtures generate real heat in an enclosed stand. LED largely solves this, which is one more reason to avoid halogen entirely.
Underestimating power load. Every venue allocates power in kilowatts and charges for it. Calculate your total load before the show, not on installation night. LED dramatically reduces this cost.
Visible wiring and fixtures. Exposed cables and mounting brackets undo thousands of rupees of design work instantly. Plan cable routing inside the structure from the start.
No on-site aiming time. Always budget an hour on the final build night to re-aim every adjustable fixture with the products actually in place.
Technical and Safety Planning
Before you finalise your lighting plan, confirm these with your organiser and fabricator:
- Total sanctioned power load in kW and the cost per additional kW
- Venue rules on rigging, hanging points and truss loading
- Required electrical certification and earthing standards
- Whether the venue permits open-flame-effect or laser fixtures
- Emergency lighting and clear-access requirements
Most Indian venues, including Helipad Exhibition Centre in Gandhinagar, Bombay Exhibition Centre and Bharat Mandapam, have specific documentation requirements. Our turnkey stall fabrication team handles this approval paperwork as standard, which saves exhibitors a considerable amount of last-minute stress.
Budgeting: What Lighting Should Cost You
As a broad planning guide, lighting typically accounts for 10 to 18 percent of a custom stall budget. Where to concentrate spend:
- One strong backlit feature, this is your single highest-return element
- Quality CRI 90+ spotlights for product zones
- Hidden strip lighting for depth
- Dimming or scene control if budget allows
- Decorative extras only after the above are covered
Switching entirely to LED also reduces your venue power charges across the show, which offsets a meaningful part of the fixture cost.
A Quick Pre-Show Lighting Checklist
- Every fixture is LED and CRI 90 or above
- One consistent colour temperature across the stall
- Hero product is at least three times brighter than ambient
- Logo and main graphic are independently lit
- No fixture shines directly into visitor eyes
- All cabling is concealed
- Total power load calculated and sanctioned
- Spare bulbs, drivers and extension boards packed
- One hour of on-site aiming time scheduled
- Photos taken with lights on for post-show marketing
Frequently Asked Questions
What is the best lighting for an exhibition stall? LED lighting with a CRI of 90 or above, layered as ambient, accent, task and decorative light. Backlit fabric walls and adjustable track spotlights deliver the strongest visual return for most exhibitors.
How bright should an exhibition stand be? Brighter than the surrounding hall, with clear internal contrast. Featured products should be roughly three times brighter than the general ambient level within your stall.
Does lighting really increase footfall? Yes. Lighting improves visibility from a distance and increases dwell time once visitors arrive, which directly increases the number of conversations your team can have.
Should I use warm or cool lighting? Warm white (2700K to 3000K) for lifestyle, hospitality, jewellery and premium retail. Cool white (5000K to 6500K) for technical, industrial, pharma and machinery brands. Neutral 4000K works for most general B2B stands.
How much does exhibition stall lighting cost in India? It generally forms 10 to 18 percent of a custom stall budget, depending on the scale of backlit features and whether control systems are included.
Related Reading
- How to Choose the Right Exhibition Stall Design Company
- Exhibition Stall Design Trends to Watch This Year
- Small Exhibition Stall Ideas That Make a Big Impact
- How to Attract More Visitors to Your Exhibition Stall
- Exhibition Stall Design Cost in India: A Complete Breakdown
Let’s Light Up Your Next Exhibition
Lighting is not decoration. It is the difference between a stall people walk past and a stall people walk into.
At Connectbase Communications, we design and fabricate turnkey exhibition stalls with lighting planned from the very first 3D render, so what you approve on screen is what you get on the floor. From compact shell scheme upgrades to large custom pavilions, we handle design, fabrication, installation and dismantling.
Get in touch for a free lighting consultation and 3D stall concept:
- Website: www.connectbasecommunications.com
- Email: bhavesh.connectbase@gmail.com
Tell us your booth size, your show dates and your product, and we will send you a lighting plan built around them.
