Exhibition Stall Design Checklist: Everything to Finalize Before Fabrication
September 7, 2026Connectbase CommunicationsComments Off on Exhibition Stall Design Checklist: Everything to Finalize Before Fabrication
Exhibition stalls are expensive, time-bound, and highly visible — which is exactly why so many exhibitors get nervous once fabrication is about to start. Once the fabrication team begins cutting, welding, and printing, changes become costly and slow. A missed measurement, an unapproved graphic, or an unclear electrical plan can derail your entire show-floor timeline.
That’s why a structured exhibition stall design checklist is non-negotiable. Whether you’re building a 9 sq. m. modular booth or a custom double-decker pavilion, finalizing every detail before fabrication saves you money, protects your brand image, and ensures your stand is ready exactly when the show opens.
At Connectbase Communications, we’ve designed and fabricated exhibition stalls across countless trade shows, and almost every last-minute crisis we’ve ever solved traces back to something that wasn’t finalized before production began. This guide walks you through everything you need to lock down before your stall goes into fabrication — so your event runs smoothly from concept to teardown.
Why a Pre-Fabrication Checklist Matters
Fabrication is the point of no return in exhibition stall design. Before this stage, changes are just edits to a 3D render or a floor plan. After fabrication starts, changes mean:
Wasted raw materials (MDF, vinyl, acrylic, metal framing)
Overtime labor charges
Reprinting costs for branding and graphics
Compressed installation timelines that increase on-site risk
Potential compliance issues with the venue or fire marshal
A well-planned checklist isn’t bureaucracy — it’s risk management. It forces every stakeholder (marketing, sales, operations, and the design agency) to align on the final vision before money is committed to materials.
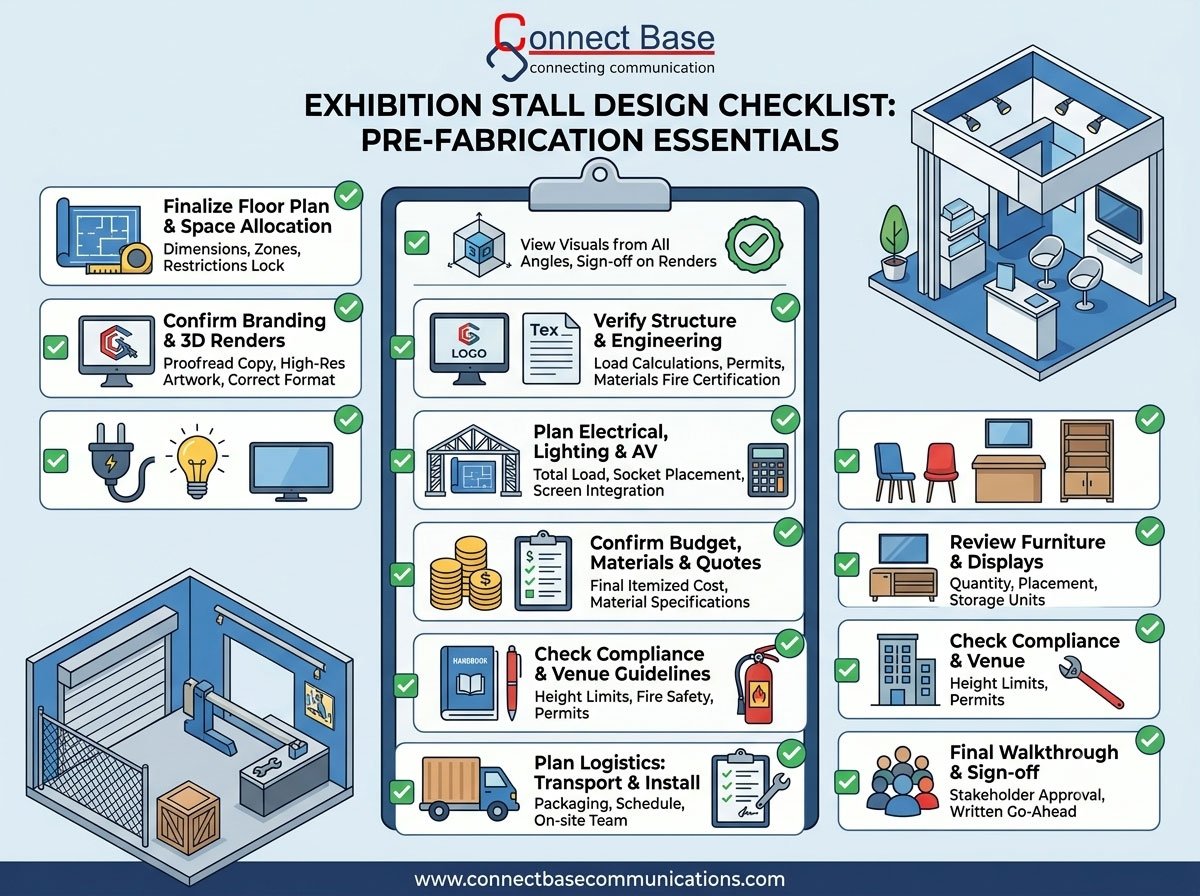
1. Finalize the Floor Plan and Space Allocation
Before anything is fabricated, your stall’s footprint needs to be locked.
Confirm the exact booth dimensions provided by the organizer (length, width, height restrictions, and column or pillar placement).
Check whether your space is inline, corner, peninsula, or island — this determines how many open sides your design can use.
Mark entry and exit points, especially if you expect high footfall.
Allocate zones clearly: reception/meeting area, product display, storage, seating, and demo zones.
Verify height restrictions with the venue — many exhibition halls cap standard stalls at 2.5–4 meters unless a special permit is taken.
A floor plan signed off by both your internal team and the fabricator prevents the most common on-site disaster: a stall that simply doesn’t fit.
2. Lock the Design Concept and 3D Renders
Once the layout is set, the creative direction needs final sign-off.
Approve the 3D visualization from every angle — front, side, and top view — not just the hero shot.
Confirm material finishes: laminate, veneer, fabric panels, backlit acrylic, vinyl wraps, or raw metal textures.
Check color palette consistency with your brand guidelines.
Ensure the design leaves adequate walkway width (minimum 900mm–1200mm is standard for comfortable movement).
This is your last real opportunity to catch design flaws — awkward sightlines, blocked signage, or a layout that looks great empty but crowded once staff and visitors are inside.
3. Confirm Branding and Graphic Content
Branding errors are the single most common last-minute fire drill in exhibition stall production. Before fabrication:
Finalize logo placement, size, and visibility from the aisle.
Proofread all text — company name, taglines, product names, and contact details (yes, even something as small as a phone number typo can slip through).
Confirm high-resolution artwork (300 DPI minimum for print) is submitted in the correct file format (AI, EPS, or high-res PDF).
Check backlit graphics are designed with proper contrast for illumination.
Get sign-off from your marketing/brand team — not just the exhibition team — since branding consistency affects the company’s image well beyond the show.
4. Verify Structural and Engineering Specifications
This is where design meets physics. Before your fabricator starts cutting material:
Confirm load-bearing calculations for any raised platforms, double-decker structures, or hanging signage.
Check rigging point approvals if you’re suspending a banner or truss from the venue ceiling.
Review wind load and stability for outdoor stalls or open-air exhibitions.
Confirm fire-retardant certification for fabrics, carpets, and panel materials — most venues will not allow installation without this documentation.
Finalize structural drawings stamped or reviewed by a qualified engineer for multi-story or complex builds.
Skipping this step doesn’t just risk delays — it risks safety and can get your stall rejected during the venue’s mandatory pre-show inspection.
5. Plan Electrical, Lighting, and AV Requirements
Power and lighting plans need to be finalized before fabrication because wiring, conduit paths, and fixture housings are often built into the structure itself.
Calculate total electrical load (lighting, AV equipment, charging points, display screens, coffee machines, etc.) and confirm it against the venue’s power allocation.
Finalize lighting design: spotlights for product displays, ambient lighting for lounges, and backlighting for graphics.
Mark exact socket and switch locations so they’re built into counters and walls rather than added as an afterthought.
Confirm AV equipment specs — screen sizes, mounting brackets, and cable routing — so the fabrication team can build in the right recesses and support structures.
Check backup power or UPS needs for critical displays or live demos.
6. Review Furniture, Fixtures, and Functional Elements
Furniture and functional add-ons are easy to overlook until the stall is nearly built.
Confirm furniture quantity and placement: counters, high tables, sofas, bar stools, product plinths.
Check storage requirements — most stalls need a lockable back-of-house area for bags, brochures, and personal items.
Finalize shelving and product display units, including weight capacity if displaying heavy products.
Plan for charging stations, Wi-Fi routers, and tech setup if your stall includes interactive kiosks or tablets.
Confirm signage holders, brochure racks, and any modular add-ons are included in the fabrication drawings.
7. Confirm Budget, Materials, and Vendor Quotes
Design ambition and budget reality need to meet before fabrication — not during it.
Get a final itemized quote covering materials, labor, transport, installation, and dismantling.
Confirm material specifications match what was quoted (a switch from real wood veneer to laminate, for instance, should be a conscious decision, not a silent downgrade).
Clarify payment milestones tied to design approval, fabrication start, and installation completion.
Factor in contingency budget (5–10%) for on-site adjustments, which are common even with the best planning.
Confirm turnaround time for fabrication and whether it allows buffer days before move-in.
8. Check Compliance, Permits, and Venue Guidelines
Every exhibition venue has its own rulebook, and non-compliance can mean your stall gets flagged or dismantled on-site.
Review the organizer’s exhibitor manual for height restrictions, material regulations, and design approval deadlines.
Submit stall drawings for organizer approval well ahead of the fabrication deadline (many organizers require this 2–4 weeks before the show).
Confirm fire safety compliance, including extinguisher placement if required for larger stalls.
Check noise and lighting restrictions, especially for stalls with AV demos or moving displays.
Verify labor and installation permits required for on-site build crews at the venue.
9. Plan Logistics: Transport, Installation, and Dismantling
Fabrication doesn’t end when the stall is built — it needs to survive transport and reassembly.
Confirm whether the stall is being built as a modular knockdown system (for easier transport and reuse) or a custom one-time build.
Finalize packing and crating specifications to prevent damage to graphics, glass, or delicate finishes.
Schedule installation and dismantling timelines with buffer time for unexpected venue delays.
Assign a clear point of contact on-site during installation to approve final adjustments.
Plan for storage and reuse if the stall will be used across multiple exhibitions — this affects material choice at the fabrication stage.
10. Do a Final Walkthrough Before Sign-Off
Before giving the final “go” to your fabrication team:
Walk through the entire checklist with all stakeholders — design, marketing, sales, and operations.
Cross-check the 3D render against the floor plan and electrical plan to ensure nothing was missed in translation.
Confirm all approvals are documented in writing (email or signed PDF), especially for branding and structural changes.
Set a single point of final approval — too many decision-makers late in the process is a common cause of last-minute changes.
Get It Right the First Time with Connectbase Communications
A great exhibition stall isn’t just about creative design — it’s about disciplined execution before a single panel is cut. At Connectbase Communications, our exhibition stall design and fabrication process is built around exactly this kind of checklist discipline, so our clients walk into their trade show with zero surprises and a stand that performs.
If you’re planning your next exhibition and want a team that handles design, engineering, branding, and fabrication under one roof, we’d love to help.
1. How far in advance should exhibition stall design be finalized before fabrication? Ideally, 4–6 weeks before the event, especially for custom builds requiring structural engineering approval or organizer sign-off.
2. What happens if design changes are needed after fabrication has started? Changes post-fabrication typically involve rework costs, material wastage, and delayed timelines — which is why this checklist emphasizes locking details beforehand.
3. Can a modular exhibition stall be customized as much as a fully custom build? Yes, to a large extent. Modular systems now offer extensive branding, lighting, and layout customization while remaining reusable and cost-efficient across multiple shows.
4. Who should approve the final exhibition stall design before fabrication? A single designated approver — usually from marketing or the exhibition project lead — should sign off after collecting inputs from design, sales, and operations teams.
5. Does exhibition stall fabrication include installation and dismantling? Most professional fabrication partners, including Connectbase Communications, offer end-to-end services covering design, fabrication, on-site installation, and post-show dismantling.

 +91 7600576410