
August 15, 2026
Connectbase Communications
Comments Off on What Is 3D Exhibition Stall Design? A Complete Guide for First-Time Exhibitors
Walk through any major trade show today and you’ll notice something: the stalls that stop people in their tracks aren’t flat backdrops with a banner and a table. They’re immersive, layered, dimensional spaces that pull visitors in before a single word is spoken. That’s the power of 3D exhibition stall design — and if you’re exhibiting for the first time, understanding what it is (and isn’t) can make the difference between a stall people walk past and one they walk into.
This guide breaks down exactly what 3D exhibition stall design means, how it differs from traditional 2D stall setups, what the design process actually looks like, and how first-time exhibitors can use it to make a strong impact without overspending.
What Does “3D Exhibition Stall Design” Actually Mean?
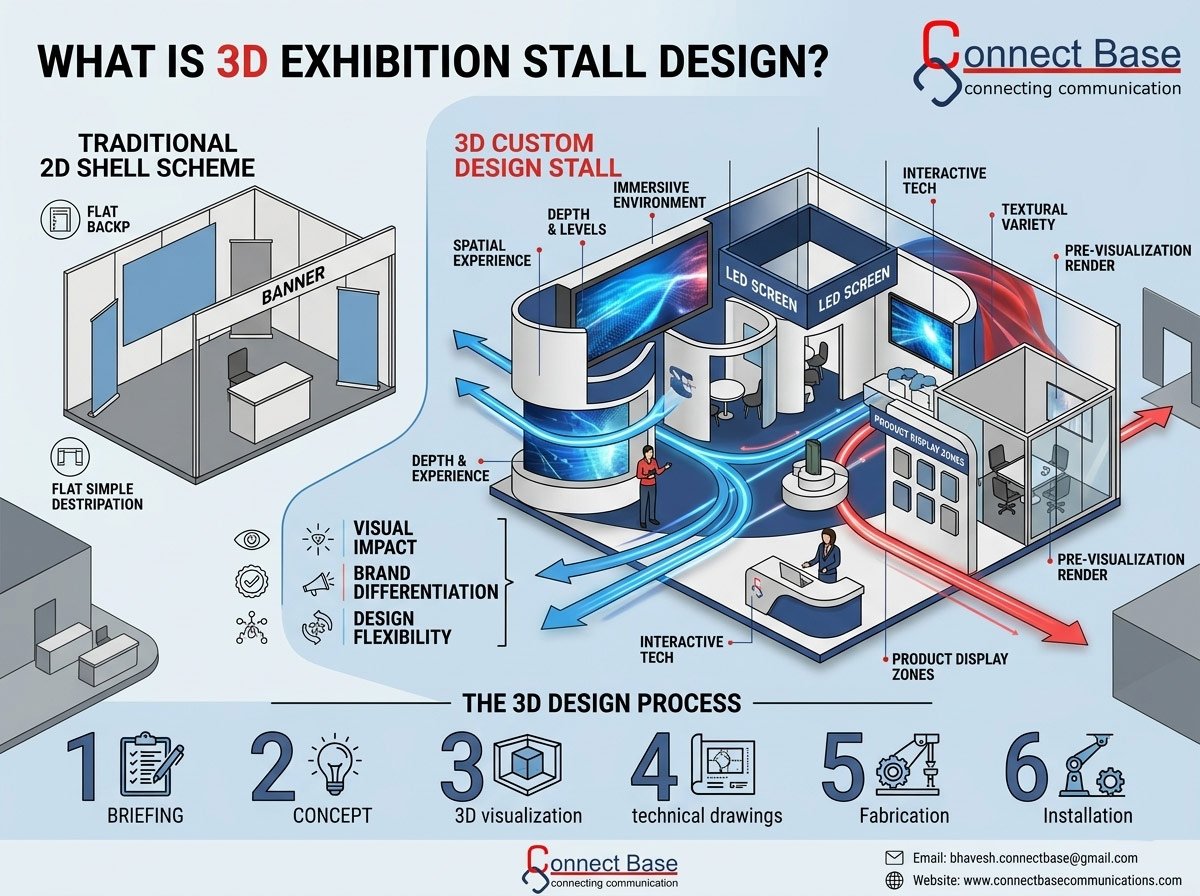
3D exhibition stall design refers to the process of conceptualizing and building a stall as a complete spatial experience — with depth, height, texture, and movement — rather than as a flat, single-plane backdrop with graphics printed on it.
In simple terms:
- 2D design = a flat fascia board, a printed banner, a table and a few chairs. Visitors see a “wall” with your logo on it.
- 3D design = a structure with multiple levels, angles, lighting layers, product zones, and walk-through paths. Visitors move through your brand, not just past it.
The “3D” doesn’t only refer to the visual rendering used during the design phase (though that’s part of it) — it refers to how the finished stall behaves in physical space. A well-designed 3D stall considers sightlines from every direction, how visitors will enter and exit, where their eyes go first, and how the structure looks from 10 feet away versus up close.
Why 3D Design Matters More Than Ever in 2026
Exhibition floors are more crowded and more competitive than they were even five years ago. With hundreds of exhibitors under one roof, attention spans at trade shows are shrinking — most visitors decide whether a stall is worth entering within 3 to 5 seconds of seeing it.
A flat, 2D stall simply cannot compete with:
- Multi-level structures that create visual height and drama
- Curved or angled walls that break the monotony of straight aisles
- Layered lighting that guides the eye toward key products or messaging
- Interactive zones (touchscreens, product demo stations, AR/VR corners) that give visitors a reason to stop
- Textured materials — wood, fabric, backlit acrylic, metal mesh — that make the stall feel premium rather than printed
For first-time exhibitors especially, a strong 3D stall design does a lot of the “selling” before your team even says a word. It signals credibility, scale, and seriousness — three things that matter enormously when you’re an unfamiliar name on a crowded show floor.
Key Elements of 3D Exhibition Stall Design
1. Spatial Planning and Visitor Flow
Before any visual design begins, a good 3D stall design starts with a floor plan — mapping how visitors will enter, move through, and exit the space. This includes deciding where the reception or welcome zone sits, where product displays go, where private meeting areas are placed, and how staff will circulate without creating bottlenecks.
2. Structural Elements (Height & Levels)
This is where “3D” becomes literal. Structural elements include raised platforms, hanging signage above the stall, mezzanine or double-decker levels, arches, and sculptural framing. These give your stall visual presence from across the hall — critical when you’re competing with dozens of other exhibitors for attention.
3. Lighting Design
Lighting isn’t just functional in a 3D stall — it’s a design tool. Backlighting on logo walls, spotlighting on hero products, ambient lighting to set a mood, and even color-changing LED elements all add depth that flat lighting simply can’t achieve.
4. Material and Texture Choices
Combining materials — such as matte wood paneling with glossy acrylic, or fabric-stretched frames with metal accents — creates visual richness. This is what separates a stall that looks “printed” from one that looks “built.”
5. Branding Integration
3D design doesn’t mean burying your branding under structural complexity. The best 3D stalls integrate logos, taglines, and key messages seamlessly into the architecture itself — on suspended signage, backlit walls, or as part of the structural framing — rather than as an afterthought sticker.
6. Interactive & Digital Elements
LED video walls, touchscreen kiosks, product demo stations, and AR/VR experiences are increasingly common in 3D stall design. These elements turn a passive walk-by into an active engagement, which is especially valuable for first-time exhibitors trying to generate qualified leads rather than just footfall.
7. Furniture and Functional Zones
Meeting pods, product display counters, storage areas, and lounge seating all need to be planned as part of the 3D layout — not added in as an afterthought once the structure is built.
The 3D Stall Design Process, Step by Step
If you’re working with a design and fabrication partner like Connectbase Communications, the typical process looks like this:
Step 1: Briefing — Understanding your brand, exhibition goals, target audience, budget, and any reference designs you like.
Step 2: Concept Development — The design team creates initial 2D floor layouts and rough 3D concepts showing the overall shape and flow of the stall.
Step 3: 3D Visualization — Photorealistic 3D renders are created so you can see exactly how the stall will look — materials, lighting, branding placement — before a single panel is fabricated.
Step 4: Revisions — Based on your feedback, the design is refined. This is the stage to finalize colors, materials, and any structural adjustments.
Step 5: Technical Drawings — Once the design is locked, the team prepares detailed fabrication drawings with exact measurements, materials, and engineering specifications.
Step 6: Fabrication — The stall components are built off-site in a workshop, including carpentry, printing, and electrical work.
Step 7: On-Site Installation — The team assembles the stall at the venue, typically over 2 to 7 days depending on size and complexity.
Step 8: Dismantling — After the event, the stall is dismantled and either stored for reuse or disposed of responsibly.
Seeing the photorealistic 3D render before fabrication begins is one of the biggest advantages of this process — it removes the guesswork and lets you approve (or request changes to) the design while it’s still just a file, not a built structure.
3D Design vs. Traditional Shell Scheme: A Quick Comparison
| Factor | Traditional Shell Scheme | 3D Custom Design |
|---|---|---|
| Visual impact | Basic, flat | High, dimensional |
| Brand differentiation | Minimal | Strong |
| Pre-visualization | Rarely provided | Photorealistic renders included |
| Design flexibility | Fixed panel sizes | Fully customizable |
| Materials | Laminate, vinyl | Wood, metal, fabric, acrylic, LED |
| Cost | Lower | Moderate to high |
| Best for | Budget-conscious, first-time small exhibitors | Brands prioritizing visibility and lead generation |
This doesn’t mean every first-time exhibitor needs a full 3D custom build — but understanding the difference helps you make an informed decision based on your budget and goals, rather than defaulting to whatever the venue offers.
Common Mistakes First-Time Exhibitors Make with 3D Stall Design
- Overloading the design. More structural elements don’t always mean more impact. A cluttered 3D stall can overwhelm visitors instead of drawing them in. Good design uses negative space deliberately.
- Ignoring sightlines from the aisle. A stunning interior means nothing if the stall doesn’t stand out when viewed from 20–30 feet away, where most buying decisions to “walk in” actually happen.
- Skipping the 3D render stage. Approving a design based on a flat sketch or verbal description often leads to surprises once the stall is built. Always insist on a 3D visualization before fabrication begins.
- Underestimating lighting. Many first-time exhibitors budget for structure and branding but treat lighting as an afterthought — even though it’s one of the most cost-effective ways to add depth and drama.
- Forgetting the “5-second rule.” Every design decision should be tested against the question: will this be clear and compelling within 5 seconds of a visitor glancing at the stall from the aisle?
- Not planning for staff and visitor flow. A beautifully designed stall that creates bottlenecks or awkward entry points will frustrate both visitors and your own team.
How Much Does 3D Exhibition Stall Design Cost?
3D design and fabrication costs vary based on size, materials, and structural complexity, but as a general guide for 2026:
- Basic 3D custom stall (9–18 sqm): ₹1,800 – ₹3,500 per sq. ft.
- Mid-range 3D stall with lighting and branding features: ₹3,500 – ₹5,500 per sq. ft.
- Premium 3D stall with multi-level structure, LED walls, and interactive zones: ₹5,500 – ₹8,000+ per sq. ft.
The 3D design and visualization phase itself (renders, concept development) is often included as part of the overall fabrication package with experienced exhibition stall contractors, rather than charged as a separate fee.
Tips for First-Time Exhibitors Planning a 3D Stall
- Start with your goals, not the design. Are you generating leads, launching a product, or building brand awareness? Your goal should shape the design brief.
- Ask for 3D renders before approving anything. Never sign off on a stall design based on a 2D sketch alone.
- Keep your key message visible from a distance. Your logo and core value proposition should be legible from at least 15–20 feet away.
- Budget for lighting and flooring separately. These are often underestimated but make a disproportionate visual difference.
- Plan for reusability if you’ll exhibit again. Modular 3D elements that can be reconfigured for future shows save significant cost over time.
- Choose a design partner who visualizes before they build. This single step prevents the majority of costly on-site surprises.
Final Thoughts
3D exhibition stall design isn’t just a trend — it’s become the baseline expectation at any competitive trade show. For first-time exhibitors, it can feel like an intimidating investment, but with the right partner and a clear design brief, it’s entirely possible to create a stall that makes a strong impression without blowing the budget.
At Connectbase Communications, we specialize in end-to-end 3D exhibition stall design — from concept sketches and photorealistic renders through to fabrication and on-site installation. If you’re exhibiting for the first time and want a stall designed around your goals, not just your square footage, we’d be glad to help.
📩 Email: bhavesh.connectbase@gmail.com 🌐 Website: www.connectbasecommunications.com
Frequently Asked Questions
1. What is the difference between 2D and 3D exhibition stall design? 2D design refers to flat, single-plane stalls like printed banners and basic fascia boards. 3D design incorporates depth, height, multiple levels, lighting layers, and structural elements to create an immersive spatial experience.
2. Do I need a 3D render before my stall is built? Yes, ideally. A photorealistic 3D render lets you visualize materials, branding, and lighting before fabrication begins, helping avoid costly last-minute changes.
3. Is 3D stall design only for large companies with big budgets? No. 3D design principles — like layered lighting, sightline planning, and material variation — can be applied even to smaller stalls (9–18 sqm) without requiring a massive budget.
4. How long does the 3D design process take? From initial briefing to final approved design, the process typically takes 1 to 3 weeks, depending on the complexity of the stall and the number of revision rounds.
5. Can a 3D-designed stall be reused for future exhibitions? Yes, many structural elements — frames, panels, and lighting rigs — can be designed for modularity, allowing them to be reconfigured and reused across multiple events.
Planning a stall for an upcoming show? Contact Connectbase Communications or call +91 7600576410 to talk through your requirements.
