
October 7, 2026
Connectbase Communications
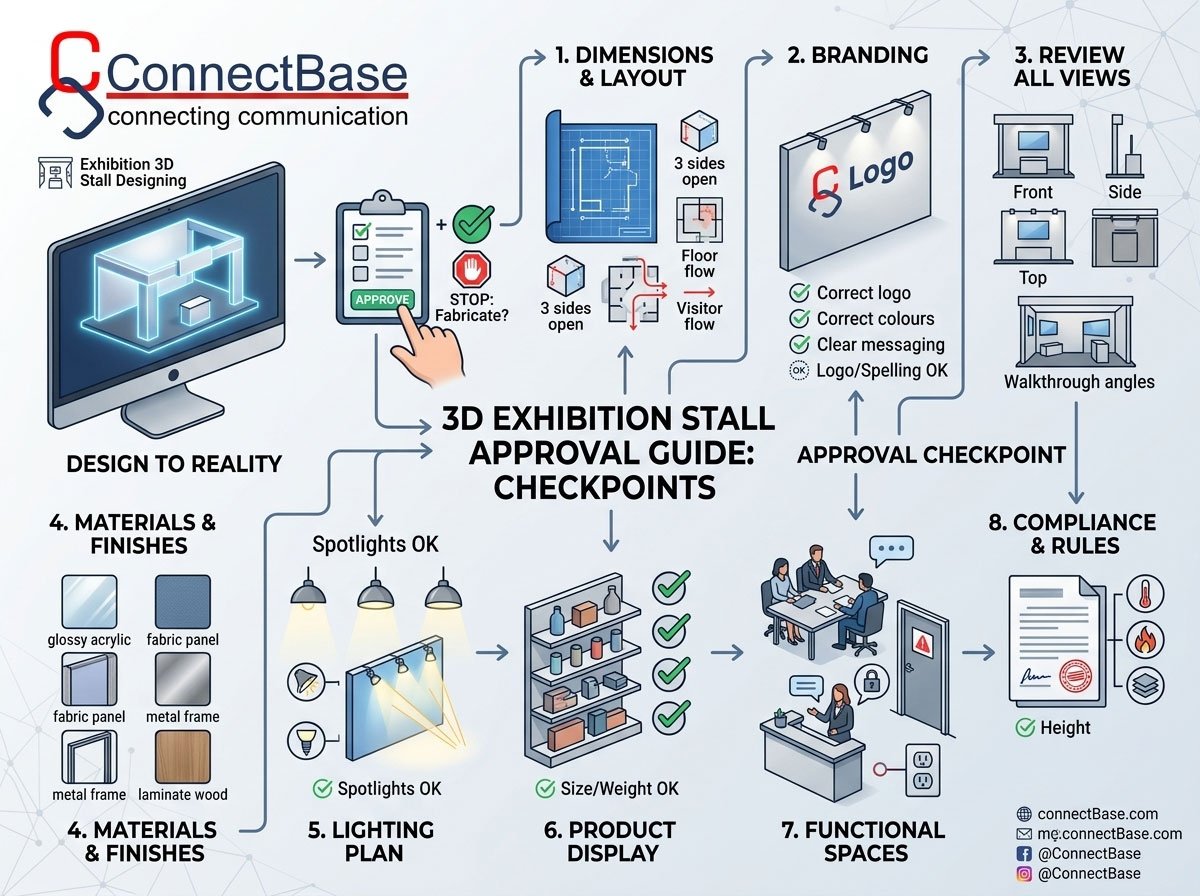
A 3D render of an exhibition stall can look stunning. The lighting is perfect, the graphics are sharp, and the stall seems to float in an empty hall with no cables, no crowds and no problems. That is exactly why approval is the most important moment in your exhibition project.
Once you say “approved”, the design moves into fabrication. Changes after that point cost money, take time and sometimes cannot be made at all. A missing storage room, a wrongly placed logo or a ceiling that breaks the organiser’s height rules will not show up in a pretty image. They show up on the setup day, when it is too late.
This guide explains what clients should check in a 3D exhibition stall design before giving approval. It will help you read the design like a professional, ask the right questions, and avoid expensive surprises. If you plan to build your stall with a professional team, you can also explore our Exhibition 3D Stall Designing service to see how a structured approval process works.
Why the Approval Stage Deserves Your Full Attention
Many exhibitors treat approval as a formality. The designer shares the 3D views, the client says “looks good”, and the project moves ahead. The trouble is that a 3D design is not only a visual. It is the blueprint that the fabrication team, graphic printers, electricians and logistics crew will follow.
A careful review at this stage helps you:
- Avoid last-minute changes that raise the budget
- Make sure the stall matches your brand and your exhibition goals
- Confirm that the design is buildable within your timeline
- Comply with organiser rules before submitting drawings
- Create a stall that works for visitors and staff, not just for photographs
Think of approval as a quality-control checkpoint. Ten extra minutes now can save days of rework later.
1. Check the Stall Dimensions and Layout First
Before judging colours or styling, confirm that the design matches your actual space.
Verify the booth size. Compare the stall area in the 3D design with your allotted space in square metres. Check length, width and the number of open sides. A 3-side open stall and a 2-side open stall need very different design thinking.
Check the floor plan. Ask for a top-view layout along with the 3D renders. A floor plan shows the real positions of the reception counter, display units, meeting area, storage and walkways. Renders can hide awkward spacing, but a floor plan rarely does.
Look at the visitor flow. Imagine ten visitors entering at the same time. Is the entry open and inviting? Is there enough space to walk without bumping into products? Does the layout guide people naturally from the entrance to your main display and then to the meeting area?
Confirm pillars and obstructions. Many exhibition halls have pillars, fire hydrants or electrical panels. Make sure the design accounts for them.
A good Exhibition Stall Designing team will always start with the space and the visitor journey, then add the creative elements.
2. Confirm Branding Is Correct and Consistent
Your stall is a three-dimensional advertisement for your company. Branding errors are among the most common (and most embarrassing) problems found after fabrication.
Check the following carefully:
- Logo accuracy: Correct version, correct colours, correct proportions, and enough clear space around it
- Company name and spelling: Check every word on every wall, fascia and counter
- Brand colours: Ask for exact colour codes (Pantone, CMYK or RGB) since screen colours differ from printed colours
- Taglines and messages: Make sure they are current and approved by your marketing team
- Contact details: Website, email, phone number and QR codes should be correct and readable
- Logo visibility from a distance: Your name should be visible from at least the main aisle, not only when someone is standing in front of the stall
If you work with a printed graphics team, see our guide on how to design exhibition stall graphics that visitors can understand quickly to understand what makes graphics effective in a busy hall.
3. Review Every View, Not Just the Best One
Designers naturally present the most flattering angle. As the client, you should ask to see more.
Request at least these views:
- Front view from the main aisle
- Side views from each open side
- Top view (floor plan)
- Corner and walkthrough views that show how a visitor would see the stall
- Close-up views of key areas such as the reception, product display and meeting zone
- Elevation drawings with measurements for walls, ceilings and counters
If something is hidden in the render, ask about it. Is there a back wall? What does the rear side of a hanging structure look like? What do neighbouring stalls see? In real exhibitions, your stall is viewed from several directions, so every side matters.
4. Check the Materials and Surface Finishes
Renders can make any material look premium. In reality, plywood, MDF, acrylic, vinyl, laminate, fabric and metal each look and behave differently.
Ask your designer:
- What material is used for each element (walls, flooring, counters, shelves, ceiling)?
- Is the finish matte, gloss, textured or wood-grain?
- Will the finish look the same in real life as it does on screen?
- Are the materials durable enough for the entire exhibition period?
- Can they be transported and reinstalled if you plan to reuse the stall?
Ask for physical samples where possible. A laminate colour that looks warm on screen may look flat under exhibition-hall lighting. Our detailed article on how to choose the right surface finish for an exhibition stall covers this topic in depth.
5. Evaluate the Lighting Plan
Lighting can make or break a stall. Many 3D renders use ideal virtual lighting that does not exist in a real hall.
Check whether the design includes:
- Ambient lighting to brighten the overall space
- Spotlights to highlight products and key branding
- Backlit panels or LED strips for visual impact
- Lighting for meeting areas that feels comfortable and not harsh
- Power requirements so that the electrical load is within the limits you booked from the organiser
Ask how the stall will look under the actual hall’s lighting, which is often a mix of high-ceiling floodlights and daylight. A design that depends on dim ambience may look dull in a brightly lit hall.
6. Make Sure Your Products Are Displayed Properly
Your products are the reason you are exhibiting. Check that the design gives them the right stage.
- Are the display units the correct size for your actual products?
- Is the weight capacity of shelves and platforms suitable?
- Are products placed at eye level where visitors will notice them?
- Is there room for demonstrations, samples or live machinery?
- Is there secure storage for brochures, spare stock and personal belongings?
For industrial exhibitors, heavy machinery may need reinforced flooring or special positioning. For consumer brands, product accessibility and handling space matter more. Share product dimensions and weights with your designer early. The article on what information you should give an exhibition stall designer before starting a project lists everything worth preparing.
7. Check the Functional Spaces for Your Team
A beautiful stall that does not work for your staff will hurt your results. Review the practical spaces:
- Reception or enquiry counter: Is it at a comfortable height and in a visible position?
- Meeting or discussion area: Is there enough seating, and is it private enough for business conversations?
- Storage room: Is it large enough and accessible without disturbing visitors?
- Pantry or refreshment space: If you plan to offer tea, coffee or water
- Charging points and sockets: Enough for laptops, screens and devices
- Staff movement: Can your team move comfortably without crossing the visitor area?
These details seem small but they decide how comfortable your team feels over a long exhibition.
8. Look at Interactive and Digital Elements
Screens, touch displays, projectors, LED walls and demo stations add value only if they are planned properly.
Check:
- Screen sizes and positions for good visibility
- Cable routing so wires are hidden and safe
- Power points near every digital element
- Content readiness (videos, presentations, product demos)
- Backup arrangements in case a device fails
If you want visitors to engage more, read our article on how interactive technology can transform an exhibition stall. Interactive elements can be powerful, but they must be built into the structure from the start, not added as an afterthought.
9. Confirm Compliance With Organiser Rules
Every exhibition has regulations. Ignoring them can lead to rejected drawings, extra charges or even forced changes on the setup day.
Ask your designer to confirm:
- Maximum permitted stall height and structure height
- Rules about double-deck structures or hanging elements
- Restrictions on flooring, carpets and electrical fittings
- Fire safety and material guidelines
- Rules for branding facing neighbouring stalls
- Deadlines for submitting drawings for organiser approval
A professional designer should know these rules or ask the organiser for the exhibitor manual. As the client, make sure the design you approve is one that the organiser will also approve.
10. Understand What Is Included and What Is Not
A 3D design alone does not tell you what you will actually receive. Before approval, ask for a clear scope.
Get written clarity on:
- Which items shown in the 3D design are part of the fabrication quote
- Which items are extra (furniture rental, plants, special lighting, AV equipment)
- Whether graphic printing is included
- Whether installation, dismantling and transport are included
- Who handles organiser permissions and electrical connections
Many disputes happen when a client assumes a sofa, plant or LED screen in the render is included in the price. Match the 3D design against the quotation item by item. If you need help with the build side, our Exhibition Stall Fabrications team can explain what goes into converting a design into a physical stall.
11. Check the Budget and Timeline Together
A design that looks great but cannot be built on time or within budget is not a good design.
Budget check: Ask whether the design can be built within your approved budget without compromising quality. Complex curves, large LED walls and custom-made furniture can raise costs quickly. If needed, ask for cost-saving alternatives that keep the look.
Timeline check: Ask for a production schedule. How many days will fabrication take? When will graphics be printed? When will materials be transported? When does installation start? Compare these with the exhibition setup dates.
Revision rounds: Confirm how many design revisions are included and how long each takes. Late changes can push the whole schedule back.
12. Think About Transport, Installation and Reuse
A stall is built in a workshop but assembled in an exhibition hall. Some designs look easy on screen but are difficult to move and install.
- Can the structure be divided into sections for easier transport?
- How many workers and how much time will installation take?
- Is there enough time on the setup day to complete the work?
- Can parts be reused for future exhibitions?
If you attend several expos in a year, a modular design can reduce long-term costs significantly.
13. Ask the Designer to Explain the Concept
A good design has a reason behind it. Ask your designer:
- Why was this layout chosen?
- How does the design support my business goals?
- What will visitors notice first?
- How does the stall stand out from neighbouring booths?
If the designer cannot explain the thinking behind the design, it may be a template rather than a tailored solution. The best stalls are created around your brand, product and audience, not copied from other projects.
14. Get Feedback From Your Own Team
Before approval, share the 3D design with the people who will actually use the stall: sales staff, marketing, product managers and management. They will notice things you might miss, such as the need for more demo space, a missing storage cupboard or a wrongly placed brand message.
Collect all feedback in one document and send it to the designer together. This avoids scattered requests and repeated revisions.
15. Get the Final Approval in Writing
When all points are resolved, ask for the final design files and approve them in writing, by email or signed approval form. This should include:
- Final 3D renders and floor plan
- Elevation drawings with dimensions
- Material and finish list
- Final graphic artwork
- Quotation and scope of work
- Production and installation timeline
A written approval protects both you and the design company. It gives everyone a single reference point if questions arise later.
Quick Pre-Approval Checklist
Use this short list before you say yes:
- Stall size, open sides and floor plan confirmed
- Logo, colours, spelling and contact details verified
- All views and elevations reviewed
- Materials and finishes understood
- Lighting and power plan checked
- Products and storage properly accommodated
- Meeting and staff spaces functional
- Digital elements planned with power and content
- Organiser rules confirmed
- Scope, budget and timeline clear
- Team feedback collected
- Written approval prepared
Common Mistakes Clients Make at the Approval Stage
- Approving based on looks only. A stunning render does not guarantee a functional stall.
- Skipping the floor plan. The layout decides how comfortable the stall feels for visitors and staff.
- Not checking the quotation against the design. This is the number one cause of budget disputes.
- Approving in a hurry. Deadlines create pressure, but rushed approval leads to costly rework.
- Letting too many people comment late. Collect all opinions before approval, not after fabrication starts.
- Ignoring organiser rules. Even a perfect design needs organiser clearance.
How to Choose a Design Partner Who Makes Approval Easy
The easiest way to avoid approval problems is to work with a team that explains clearly, shares complete drawings and respects your timeline. Look for a company that offers 3D design, detailed drawings and fabrication under one roof, since this keeps the design and the final stall consistent.
If you are comparing options, our guide on how to choose an exhibition stall design company in Ahmedabad explains what to look for in a reliable partner.
Frequently Asked Questions
How many 3D views should I ask for before approval?
At minimum, ask for a front view, side views, a top-view floor plan, walkthrough angles and close-ups of key areas such as the reception and meeting zone.
Can I request changes after the 3D design is shared?
Yes. Most designers include revision rounds. Confirm how many are included and the timeline for each so your schedule stays on track.
What happens if I request changes after fabrication starts?
Changes after fabrication begins usually cost extra and may delay delivery. That is why a careful review before approval is so important.
Does a 3D design show the exact final look of the stall?
It is a close representation, but real materials, lighting and colours can look slightly different. Ask for samples and exact colour codes to reduce differences.
How long does a 3D exhibition stall design take?
It depends on the stall size and complexity, but a first concept is usually ready within a few days. Final drawings take longer, depending on revisions.
Final Thoughts
Approving a 3D exhibition stall design is a business decision, not just a creative one. Look beyond the render and check dimensions, branding, materials, lighting, function, compliance, budget and timeline. Involve your team, ask questions, and approve in writing.
A well-reviewed design leads to a smooth fabrication process, a confident setup day and a stall that actually brings visitors and leads to your business.
Ready to Plan Your Next Exhibition Stall?
Connectbase Communications helps brands create impactful exhibition stalls, from concept to 3D design to fabrication and installation.
Website: www.connectbasecommunications.com
Email: bhavesh.connectbase@gmail.com
Contact us today for a free consultation and get a stall design that is ready to impress.
