
Exhibition Stall Design & Fabrication
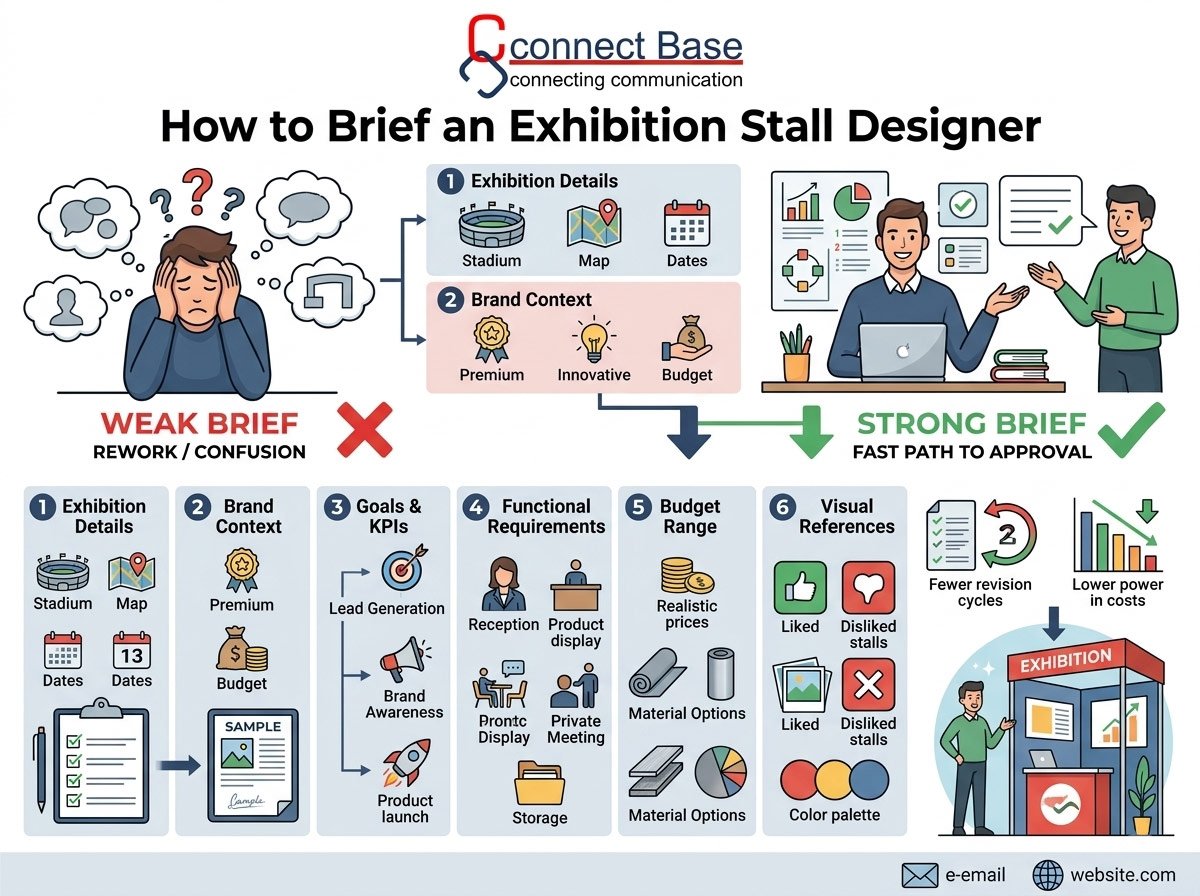
Here’s a pattern most exhibition stall designers will confirm: the projects that run smoothly, finish on budget, and deliver a stall the client actually loves almost always start with a strong brief. The projects that go through five rounds of confused revisions, blow past the timeline, and end in a stall nobody’s fully happy with? They almost always start with a vague one.
A briefing is not a formality before the “real work” begins — it is the foundation the entire design and fabrication process is built on. And yet, most exhibitors have never been taught how to brief a designer properly. This guide walks you through exactly what to include, what questions to expect, and how to avoid the most common briefing mistakes — so your next exhibition stall project starts on solid ground.
A weak brief doesn’t just slow things down — it directly affects the final cost and quality of your stall. When a designer doesn’t have clear information, they’re forced to make assumptions. Those assumptions get built into concept designs, which then get rejected during review, triggering rework. Every round of rework costs time, and often money, especially if changes are requested after fabrication drawings are already finalized.
A strong brief does the opposite. It gives the designer everything they need to propose a stall that’s right the first time — or close to it — which means fewer revision cycles, a faster path to approval, and a final structure that actually reflects what you had in mind.
Think of the brief as the bridge between “what’s in your head” and “what the designer can actually build.” The more detail and clarity you provide on that bridge, the less gets lost in translation.
Start with the basics — but don’t skip them, since they shape almost every other design decision:
The location within the hall matters more than exhibitors often realize — a corner stall has two open sides and needs a completely different design approach than an in-line stall with only one open face.
A designer building your stall needs to understand your brand almost as well as your marketing team does:
If you have a brand guideline document, share it. If you don’t, at least share your website, recent marketing materials, or competitor stalls you admire (and ones you don’t) — this gives the designer a visual reference point.
This is the section most exhibitors skip — and it’s arguably the most important one. A stall designed to generate leads looks very different from one designed purely for brand visibility or one designed to launch a new product.
Be specific:
When a designer understands your goals, they can prioritize the layout accordingly — for example, a lead-gen-focused stall needs an open, inviting entry with minimal barriers, while a partner-meeting-focused stall needs more enclosed, private conversation spaces.
List out every functional zone you need, even if it feels obvious:
Skipping this step is one of the most common causes of mid-project surprises — a client realizing three weeks in that they forgot to mention they need a lockable storage room, for instance.
Many exhibitors are hesitant to share a budget upfront, worried the designer will simply spend the full amount regardless of what’s needed. In reality, the opposite tends to happen — without a budget range, designers often either propose something far too ambitious for your actual spend (leading to disappointment when it’s scaled back) or something too conservative (leaving value on the table).
Sharing even a rough range — “somewhere between ₹X and ₹Y” — lets the designer propose materials, structural complexity, and finishes that are realistic for your investment level, saving everyone time.
Words alone rarely convey a design vision accurately. Include:
A simple mood board — even a rough one — communicates more in five minutes than a page of written description.
Be upfront about your deadlines:
Designers often build in buffer time for revisions — but only if they know about your internal timeline constraints from the start.
If you want a simple template to fill in before your first meeting with a designer, use this structure:
Having this ready before your first call with a designer — even in rough bullet-point form — can cut weeks off the overall project timeline.
If you’re working with an experienced exhibition stall design partner, expect them to ask follow-up questions beyond your written brief, such as:
If a designer skips straight to sending you a quote without asking any clarifying questions, treat that as a red flag — it usually means the proposal that follows will be generic rather than tailored to your actual needs.
At Connectbase Communications, every project begins with a structured briefing session — either in person or over a call — where we walk through your exhibition details, business goals, functional needs, and budget together before a single design concept is created. This isn’t just a formality; it’s how we ensure the first concept we present is already close to what you have in mind, rather than a generic starting point that needs multiple rounds of correction.
If you’re preparing to exhibit and want a design process that starts with genuine understanding rather than guesswork, we’d be glad to walk you through our briefing approach.
📩 Email: bhavesh.connectbase@gmail.com 🌐 Website: www.connectbasecommunications.com
A great exhibition stall doesn’t start with a 3D render — it starts with a great brief. The time you invest upfront in clearly communicating your goals, budget, functional needs, and brand vision pays off many times over in a smoother design process, fewer revisions, and a final stall that actually reflects what your business needed it to achieve. Before your next exhibition, take the time to prepare a proper brief — your designer, and your final stall, will be better for it.
1. What information does an exhibition stall designer need from me? At minimum: exhibition details (venue, dates, stall size), your business goals for exhibiting, functional requirements (meeting rooms, product displays, storage), brand assets, budget range, and any visual references.
2. Should I share my budget with the stall designer upfront? Yes. Sharing a budget range helps the designer propose realistic materials and structural options, avoiding wasted time on proposals that don’t match your actual investment level.
3. How far in advance should I brief a designer before my exhibition? Ideally 6 to 8 weeks before the event, to allow adequate time for design concepts, revisions, fabrication, and installation without rush charges.
4. What if I don’t have brand guidelines ready? Share whatever you have — your website, recent marketing materials, or even competitor examples you like or dislike. A designer can work with informal references if formal guidelines aren’t available.
5. Can I change my brief after the design process has started? Minor adjustments are usually manageable, but significant changes after fabrication drawings are finalized can affect both cost and timeline. It’s best to consolidate all requirements before the brief is finalized.
Planning a stall for an upcoming show? Contact Connectbase Communications or call +91 7600576410 to talk through your requirements.
Keep reading
WhatsApp us
 +91 7600576410